|
| SESSION 5 Program Basics |
|
Let's prepare the development environment |
|
|
|
|
|
|
|
|
|
|
 |
 |
|
 |
 |
|
|
 |
 |
|
 |
 |
|
|
|
|
|
I'm looking forward to
today as well!
|
|
|
|
|
|
 |
 |
|
 |
 |
|
|
 |
 |
 |
 |
 |
|
|
|
|
 |
|
|
|
|
 |
 |
|
 |
|
|
|
|
|
|
|
|
|
|
|
|
|
|
|
|
|
|
|
|
|
 |
 |
|
Woohoo!
Woohoo!
Woohoo!
From now on
we're finally doing
programming, right! |
|
|
|
|
|
|
|
|
|
|
|
|
|
|
|
|
|
|
|
|
|
|
|
|
|
|
 |
|
|
|
|
|
|
|
|
|
|
|
|
|
|
|
|
|
|
|
|
|
|
|
|
|
Wait just a minute!
First of all, before we start programming,
let's setup the IDE (Integrated
DevelopmentEnvironment).
You need to change it so it's easy to use.
Go right ahead and
launch NetBeans.
Double-click on the icon on your desktop. |
|
|
|
|
|
|
|
|
|
|
|
|
|
|
|
|
|
|
|
|
|
|
|
|
|
|
|
|
|
|
|
|
|
|
|
|
|
|
|
|
|
|
|
|
|
|
|
|
|
|
|
|
Okay!
Double-click, and…
it's running!
So this…
is an Integrated Development
Environment…
It's got, like, so much stuff.
|
|
|
|
|
|
|
|
|
|
|
|
|
|
|
|
|
|
|
|
|
|
|
|
|
|
|
|
|
|
|
|
|
|
|
|
|
|
|
|
|
|
|
|
|
|
|
|
|
|
|
|
This is an overview
of the IDE
(Integrated Development
Environment).
I'll tell you the things you use
most, so
remember the names.
If you drag the tab parts of the
windows,you can switch them
around to where you want them.
If you make a mistake and
accidentally close a window,
you can open it again from
'Menu' -> 'Window'. |
|
|
|
|
|
|
|
|
|
|
|
|
|
|
|
|
|
|
|
|
|
|
|
|
|
|
| *heart pounding* |
 |
|
|
|
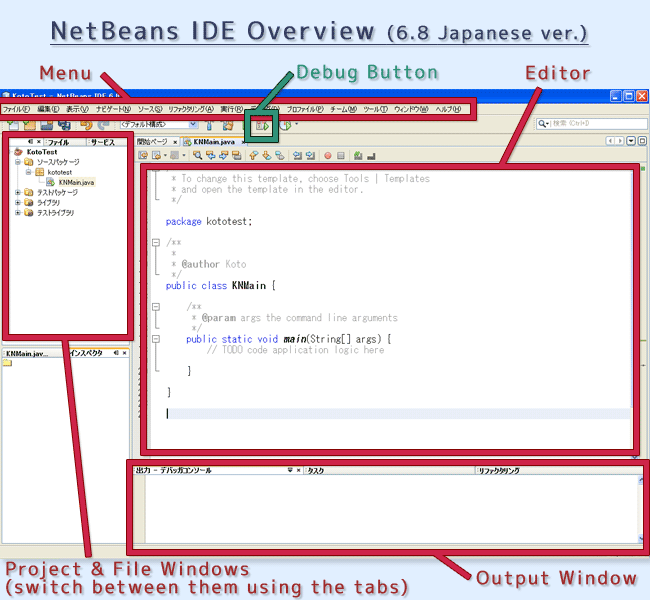
* This is a screen after a project has been
created.
In the initial screen, a 'startup page' will be
displayed in the editor.
|
 |
|
 |
|
|
| Name |
Description |
| Menu |
You can access almost all the features
of NetBeans here.
This includes the functions that have
buttons in the top
area. |
| Editor |
This is the area where you write
program code.
Initially a 'startup page' will be displayed. |
| Project Window
|
This displays the framework of the project
from a
package viewpoint.
|
| File Window |
This displays the framework of the project
from a file &
folder viewpoint.
|
| Output Window |
This is a window which displays the standard
output. |
| Debug Button |
This is a shortcut button for
'Menu' -> 'Debug' ->
'Debug Main Project'.
Each button is a shortcut for a feature
from the menus
that is often used.
|
|
|
* |
Even if you downloaded a different version of
NetBeans,
there should be no major differences. |
|
|
|
 |
|
 |
|
|
* These will be
used in the coming explanations, so please
remember the names. |
|
|
|
|
|
|
|
|
|
|
|
|
|
|
|
|
|
|
|
|
|
|
|
|
|
|
Next let's setup Javadoc
in the IDE.
Did you download Javadoc
together
with the IDE?
Javadoc is a Java API manual.
By setting this up within the IDE
(Integrated Development
Environment),
you'll be able to look up APIs immediately
while you're developing your program.
If you use different language versions for
different countries,
You'll be able to look them up using those
languages. |
|
|
|
|
|
|
|
|
|
|
|
|
|
|
|
|
|
|
|
|
|
|
|
|
|
|
|
|
|
|
|
|
|
|
|
|
|
|
|
|
|
|
|
|
|
|
|
|
|
|
|
Ummm,
now where
did I put that file…
|
|
|
|
|
|
|
|
|
|
|
|
|
|
|
|
|
|
|
|
|
|
|
|
|
|
|
Precisely speaking,
Javadoc is in
document format.
|
|
|
 |
|
The javadoc setting has
been already completed, The
Setting
is
unnecessary.Please
advance next.
When Java itself is updated,
you may not be able to download Javadoc
(zip) for various languages.
In that situation, please carry out
'Javadoc Setup Method 2'.
You will be able to acquire information
online using the internet.
(Requires NetBeans 7.0 or above.) |
|
|
|
|
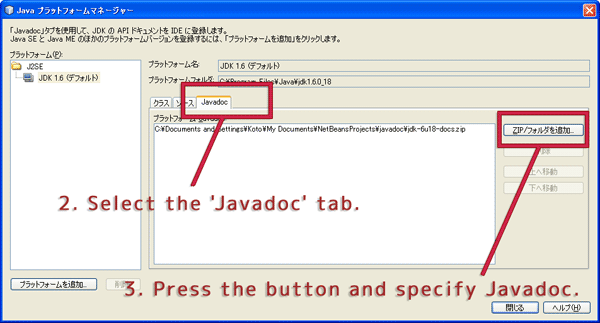
Javadoc Setup Method |
|
1. Select the
Menu -> Tools -> Java Platforms |
|
2. Select the 'Javadoc' tab. |
3. Press the button and specify the
Javadoc file (zip file).
|
 |
|
|
|
|
|
|
|
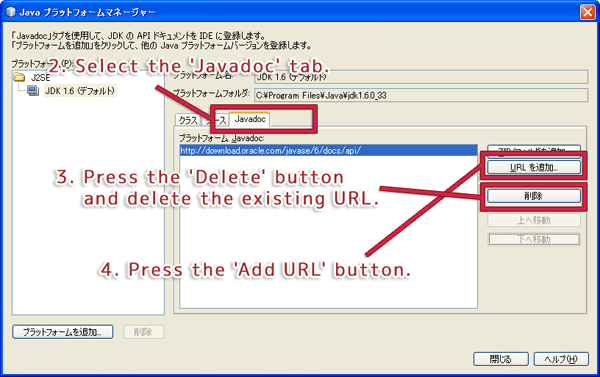
Javadoc Setup Method 2 (if you can't
download the zip file) |
|
* Requires NetBeans 7.0 or above to be
installed. |
|
1. Select the Menu -> Tools -> Java
Platforms |
|
2. Select the 'Javadoc' tab. |
|
3. Press the 'Delete' button and delete
the existing URL. |
4. Press the 'Add URL' button.
|
 |
|
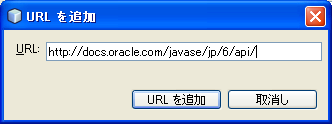
5. Enter one of the following addresses
in the 'Add URL' window.
(Please choose from the following URLs
based on the version of Java you are
using.) |
|
|
| |
|
6. Press the 'Add URL' button. |
 |
|
|
|
|
|
|
|
|
|
|
|
|
|
|
|
|
|
|
|
|
|
|
|
|
|
|
|
|
Now, let's make the IDE more user-friendly.
Development will be easier
if you make the IDE easier for you to use,
like changing the font size in the editor, and so on.
The editor is a feature for writing text.
It's basically a word processor feature.
For now, let's go with the bare minimum for usability. |
|
|
|
|
|
|
|
|
|
|
|
|
|
|
|
|
|
|
|
|
|
|
|
|
|
|
Geez, you.
You forget so
quickly…
It's the zip file. |
 |
|
 |
I'm sorry!
I know I put it
somewhere.
Ummm,
now where
was it… |
|
|
|
|
|
|
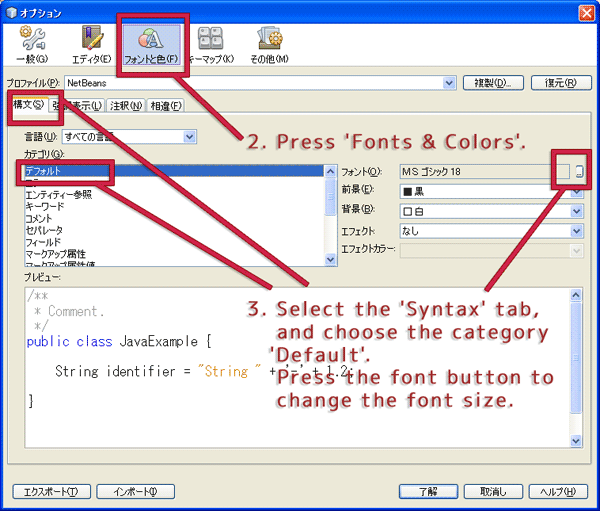
Editor Font Size Setup Method |
|
1. Select the Menu -> Tools -> Options |
|
2. Press 'Fonts & Colors'. |
3. Select the 'Syntax' tab, and choose
the category 'Default'.
Press the font button to change the font
size.
|
 |
|
|
| |
|
|
|
|
|
|
|
|
|
|
|
|
|
|
|
|
|
|
|
|
|
|
|
|
|
|
That should be good enough
for now.
This section has a lot of setup
for the editor.
There's lots of things that can
be changed,
so gradually study it and
change it
to how you like it. |
|
|
|
|
|
|
|
|
|
|
|
|
|
|
|
|
|
|
|
|
|
|
|
|
|
|
|
Just as I thought.
For you to go that
far…
you're a morooon,
aren't you? |
|
|
 |
Ah….
I thought that 'zip'
thing was a virus,
so I deleted it… |
|
|
|
|
|
|
|
|
|
|
|


