|
| SESSION 5 Part3 |
|
Create a project |
 |
|
|
|
|
|
|
|
|
 |
 |
|
 |
 |
|
|
 |
 |
|
 |
 |
|
 |
 |
|
Now, let's try actually using
the IDE
to create a program.
First we will create a
project. |
|
|
|
|
|
 |
 |
|
 |
 |
|
|
 |
 |
|
 |
 |
|
| |
|
|
|
|
|
|
|
|
|
|
|
|
|
|
|
|
|
|
|
|
|
|
|
|
|
|
|
|
|
|
|
|
Woohoo!
At last we're really
starting!
Project,
let's create a project!
Huh!? What's a project? |
|
|
 |
 |
|
|
|
|
|
|
|
|
|
|
|
|
|
|
|
|
|
|
|
|
|
|
 |
|
|
|
|
|
|
|
|
|
|
|
|
|
|
|
|
|
|
|
|
|
|
|
|
|
|
A 'project' refers to
something used to manage the program within
the IDE (Integrated
Development Environment).
By creating this, you can centrally manage
your development in
the IDE,
which is useful for a lot of things.
And this isn't just related to languages like Java.
It's
basically the same
no matter which
IDE (Integrated Development Environment) you
use.
Generally, you create a project for each application.
For a game, it's like something to manage a single game.
Look, 'project' here is just another word for 'planning'.
And if it were an action game called 'Koto Bomber',
then it'd be
the 'Koto Bomber' project. |
|
|
|
|
|
|
|
|
|
|
|
|
|
|
|
|
|
|
|
|
|
|
|
|
|
|
That's, like,
so cool. |
 |
|
 |
You think so?
But you seem to
be getting into it.
|
|
|
|
|
|
|
|
|
|
|
|
|
|
|
|
|
|
|
|
|
|
|
|
|
|
|
|
|
With Java you can create
all types of programs.
* Applets that run within a browser
* Servlets that run on web servers
* JavaWebStart which can automatically
update
Etc, etc…
Of all these, we're going to make a
Java application this time.
A Java application falls under
the category of "general software",
being something that runs
when you
double-click on it.
So without delay, let's try creating
a project for your Java application
using your IDE. |
|
|
|
|
|
|
|
|
|
|
|
|
|
|
 |
|
|
|
|
|
|
 |
|
|
|
|
|
|
|
|
|
|
|
|
|
|
|
|
|
|
|
|
|
|
|
|
|
|
|
|
|
You can create
all sorts of things
with Java, huh!
|
|
|
|
|
|
|
|
|
|
|
|
|
|
|
|
|
|
|
|
|
|
|
|
|
|
|
|
|
 |
|
|
Method for Creating a Project |
|
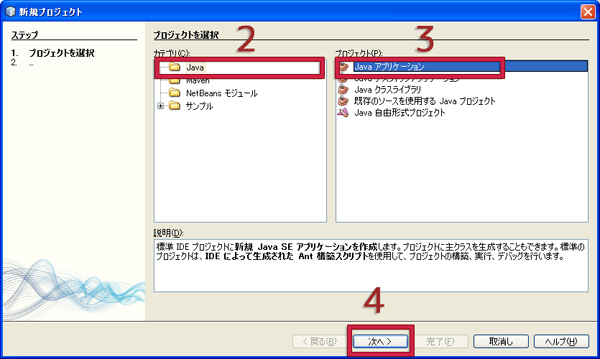
1. Select Menu -> File -> New Project. |
|
2. Select 'Java' from the categories. |
|
3. Select 'Java Application' from the
projects. |
4. Press the 'Next' button.
|
 |
|
| 5. Enter "KotoTest" for the project
name. |
|
6. Enter "kototest.KNMain" for 'create
main class'. |
7. When you press the 'Finish' button,
the project will be created.
Please don't press the button yet until
instructed to do so.
|
* It's fine for all the other entries to
remain as their default.
Please enter all the characters as
half-width, and enter the upper-case and
lower-case characters correctly.
|
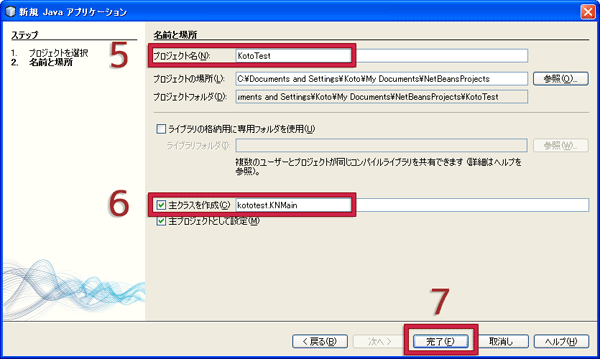
* You should also check the 'Project
Location'.
By default, it will be saved in 'My
Documents/NetBeanProjects'.
|
|
|
|
|
|
|
|
|
|
|
|
|
|
|
|
|
|
|
|
|
|
|
|
|
|
|
|
This is just a test,
so give it
the project name of
"KotoTest" (*5).
It's easy to understand,
right? |
|
|
|
|
|
|
|
|
|
|
|
|
|
|
|
|
|
|
|
|
|
|
|
|
|
|
|
|
|
|
|
|
|
|
|
|
|
|
|
|
|
|
|
|
|
|
|
|
|
|
|
Ehehe.
No matter how you
look at it, it's mine!
|
|
|
|
|
|
|
|
|
|
|
|
|
|
|
|
|
|
|
|
|
|
|
|
|
|
|
|
|
 |
|
|
 |
|
 |
|
|
|
Project Rules |
| |
| * |
Make sure to write the project name in
half-width
alpha-numeric
characters. |
|
* |
The first character of the project name
is
upper-case. |
|
| |
* Note: most of the above will be doneautomatically
for
you by the IDE.
|
|
|
|
 |
|
 |
|
|
|
|
It's important
to make it easy
to understand.
|
|
|
|
|
|
|
|
|
|
|
|
|
|
|
|
|
|
|
|
|
|
|
|
|
|
|
With Java, the first character of
the project name is
upper-case.
This is the same whether your IDE is
NetBeans or Eclipse.
It's okay to use a different name,
but please follow this
custom.
For example, you could put 'Pj'
(an abbreviation of 'project')
at the beginning and the end of
the project name…
Just make sure that it's easy to
understand.
|
|
|
|
|
|
|
|
|
|
|
|
|
|
|
|
|
|
|
|
|
|
|
|
|
|
|
|
 |
|
|
|
|
|
|
|
|
|
|
|
|
|
|
|
|
|
|
|
|
|
|
|
|
|
Huh?!
What's this
"Create main class"
thing? (*6)
|
|
|
|
|
|
|
|
|
|
|
|
|
|
|
|
|
|
|
| |
|
|
|
|
|
|
|
|
|
|
|
|
|
|
|
|
|
|
|
|
|
|
|
|
|
|
|
|
|
|
|
|
Ahh, that adds the minimum
requirement source file
at the same time the project
is created.
First of all, let's press
the 'Finish' button (*7)
like this,and create a project.
Then I'll explain about
the
source file.
|
|
|
|
|
|
|
|
|
|
|
|
|
|
|
|
|
|
|
|
|
|
|
|
|
|
|
|
|
|
Some of the items automatically created
with project creation |
 |
|
|
|
|
|
|
|
|
|
|
|
|
|
|
|
|
|
|
|
|
|
|
|
|
|
|
|
|
|
Woah.
So when I press the
'Finish' button…
Wow! All sorts of
things appeared.
|
|
|
|
|
|
|
|
|
|
|
|
|
|
|
|
|
|
|
|
|
|
|
|
|
|
|
|
|
|
|
|
|
|
|
|
|
|
|
|
|
|
|
|
|
|
|
|
|
|
|
|
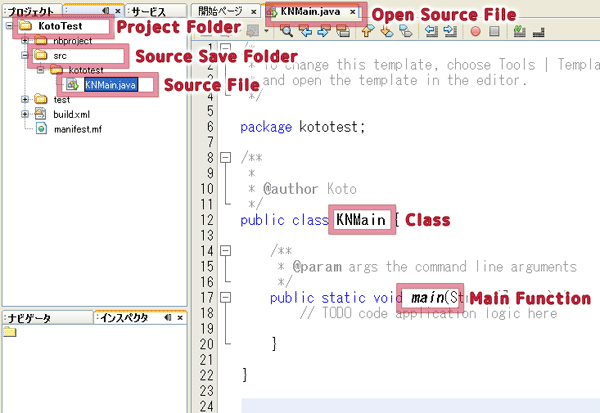
Press the file window tab,
then double-click on
KNMain.java
and open it.
Now, this is an overview of the
project that you've created.
When you create a project,
basic setup is carried out,
such as automatic creation of
various things
needed for
development.
First let's remember the basic
configuration
of the folders.
|
|
|
|
|
|
|
|
|
|
|
|
|
|
|
|
|
|
|
|
|
|
|
|
|
|
|
|
|
|
Some of the items automatically created
with project creation |
|
|
|
 |
Okay! |
|
|
|
|
|
|
|
|
|
|
|
|
|
|
|
|
|
|
|
|
|
|
|
|
|
|
The basic configurations of the project folders is
something
like this.
First of all, there's the 'project folder', right?
From now on, the files related to this project will
all be
created in there.
There's a folder called 'src' in there.
This is a folder created by the IDE for managing
the source
files.
From here on the source files will be put in here.
By the way, 'src' is an abbreviation of 'source',
and other IDEs also use the same method for
management.
There's also all sorts of other settings,
but for now this will
do.
Please do your best to remember this. |
|
|
|
|
|
|
|
|
|
|
|
|
|
|
|
|
|
|
|
|
|
|
|
|
|
|
|
|
|
|
|
|
|
|
|
|
|
|
|
|
|
|
|
|
|
|
|
|
|
|
|
|
Oh, and…
A source file has been added in the src folder.
This time we chose KNMain as the main class name
when we created the project, right? *6
In this way, when you create a project, with
the IDE's automatic
creation feature,
| 1. |
A source file called
KNMain.java is
added to the project. |
| 2. |
Samples for the
KNMain class and Main function
are written in
KNMain.java. |
In other words, even though you haven't written
each one from
scratch yourself,
the IDE will prepare a
sample class with a main function for
you.
Really, if you do it all by yourself you have to create
all
sorts of things in keeping with the rules.
Here it's carrying out the preliminary work of creating
a
program for you.
Ahhh, IDEs are so useful. |
|
|
|
|
|
|
|
|
|
|
|
|
|
|
|
|
|
|
|
|
|
|
|
|
|
|
 |
 |
They really are!
I don't really
understand,
but
it's doing so
many things
for me!
It's so easy! |
|
|
|
Some of the items automatically created
with project creation |
|
|
|
|
|
|
|
|
|
|
|
|
|
|
|
|
|
|
|
|
|
|
|
|
|
|
|
|
|
NAPO-chan,
what's a
source file?
|
|
|
|
|
|
|
|
|
|
|
|
|
|
|
|
|
|
|
|
|
|
|
|
|
|
|
|
|
|
|
|
|
|
|
|
|
|
|
|
|
|
|
|
|
|
|
|
|
|
|
|
Oh, that's right.
Okay, let's look at the things
created
in a little more detail…
Next let's take a look at
source files. |
|
|
|
|
|
|
|
|
|
|
|
|
|
|
|
|
|
|
|
|
|
|
|
|
|
|
 |
|
|
|
|
|
|
|
| |
|
|
|